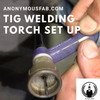
How to Assemble a Series #9 #20 TIG Welding Torch.
This post will show you how to set up your TIG welding torch series #9 and #20 but will be similar to setting up torch series #17 #18 #26.
Step 1: Gas Lens
Screw in Gas Lens into Welding Torch Head and finger tighten.
Step 2: Collet Body
Insert Collet Body, slit opening facing downward toward the cup side
Step 3: Tungsten Electrode
Insert your Tungsten sharp side facing out the cup side. (note: the tungsten in this picture is sharpened on both sides, i don't recommend doing this unless your work is okay with it. You want to know what color tungsten you are using and sharpening both sides ruins the color labeling.
Step 4: Back Cap
Screw in Back cap but do not fully tighten down until step 6.
Screw on your Welding Cup (mfurick #12) to your gas lens and tighten all the way.

Step 6: Set Stick Out Length
With everything tightened on your TIG welding torch except for the back cap. Set your tungsten stick out length for your application than tighten down the back cap and your ready to weld!
Want to get better at welding in half the time?